I hadn’t created danger bearing in probably about four years. I was required to do so this past weekend as I was navigating for a friend who was certifying as skipper in the CPM program at Club Nautique. Our sail took us out into the ocean for a distance then back to shore in the Pillar Point Harbor near Half Moon Bay.
I had forgotten one important point when establishing a danger bearing.
A danger bearing should always be a bearing to a fixed object on land or sticking out of water on rocks (lighthouse, etc) that, if you stay one side of that bearing or the other you’re either in danger or not.
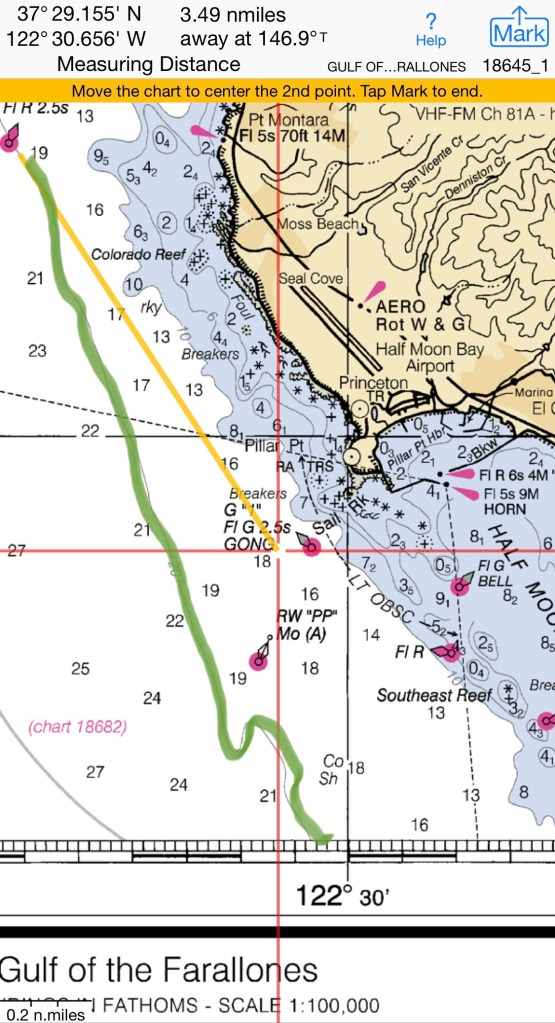
What I provided was a line much like the one below. It was constructed as an imaginary line we didn’t want to cross. I had suggested that if we maintain a course greater than about 134 M or 130C given the compass deviation on that approximate course, in that area that we should be safe and not go over the rocky shoal. If we sailed 120C, for example, we’d sail towards shore and possibly over the shoal where the waves break. In fact, the shoal is such that the break is so severe that winter swells create the waves for the Maverick’s surfing competition in this area of the chart. There are no danger signs out there so one has to craft a way to keep out of the area. Of note, our course was greater than the one indicated and my feeling was that the helmsman should not steer less than 130 or we’d head toward the shoal waters. In principle, on the chart, that seems to be a correct method to stay safe.

However, water is moving. The flood tide might drift us over that shoal even though we are maintaining a compass course greater than 130 degrees. Leeway is another force that could have put us in danger happily sailing a “safe” course and ending up on the rocks. So, I was incorrect. My approach may have worked but it had flaws and could have failed. Fortunately, we would have used other methods available to stay out of trouble. Radar is my best friend on a sailing vessel!
Importantly, if one has constructed a danger bearing to a fixed object on land then your danger bearing is good on the chart and in the sea in spite of leeway, tidal flows, work at the helm, etc. In this region of our sail, as of today, I couldn’t find a good standard danger bearing headed SE that would keep us off the shoals.
How, then, might one navigate these waters to get into the Pillar Point Harbor?
A traditional back bearing to R26 may have worked. The magnetic bearing would be a reciprocal of the bearing indicated above. Best to use the handheld compass here. One caveat is that it would be useful to do a calculation from a reasonable height of the buoy that can be seen relative to the height of your eyes in order to determine the distance off you could see the buoy in clear weather. One might lose the back bearing after 3 or a few more nautical miles from height of eyes as the farther one travels the less of the buoy one sees. Further, they seem to blend with background as the chroma of the object is lost with distance. Atmospheric conditions would indeed limit visibility in many cases. In decreased visibility, as is common with the marine layer fog during summer, you would have to use radar to determine your bearing while in transit. I would remind you that buoys move around a lot on their moorings and one needs to consider this fact when using a buoy for a bearing when it is close to a shoal or other submerged objects you wish to avoid.
As I have considered this part of the passage even more, it seems to me that the best way to navigate from the vicinity of R26 to PPH is the either pick up G1 or Pillar Point safe water mark either visually or with radar and transit to one of those locations. As we saw departing PP Harbor Sunday morning, when there is a significant swell, waves do break over that shoal near G1 and south of this buoy. One can’t see those breaks from the sea side of the shoal. So, with any swell whatsoever I think it is always safest to go around the pillar point safe water mark. When i say go around I mean pass to the west then south of it. This will ensure that, in standard conditions, you have it to windward; you’re going to it’s lee. Meaning you won’t have wind or the coastal current driving you into it. Be prepared, however, to take a different course around it if you don’t have a NW wind, the most common wind off our shore. For example if you have a W or SW wind then go to the east of it to be in its lee. Keep in mind that PP is easy to see on radar so you can track toward it. But, remember, it’s radar signature might disappear on a sweep of radar if you are in a trough of a swell as it may be, too.
Another way to traverse this area and stay out of trouble would be to stay at the 20 fathom, or 120 feet, line or greater as far as depth is concerned until you go past PP and are prepared to turn to shore. As noted on the chart, if you stay at that 20 fathom line you’re going to ultimately see the PP safe water mark. Know it’s location by radar in limited visibility. You should miss and not crash into it unless it is off station. This is where consulting the local notice to mariners beforehand is essential. One wouldn’t want to plan to use a navigation aid that is off station or even missing.
I’ve learned that one never stops navigating …..or learning about navigating a vessel underway.
Here’s a link explaining construction of a danger bearing.
https://eoceanic.com/sailing/tips/27/149/clearing_hazards_with_a_danger_bearing/
Here’s a nice link regarding back bearings including some math history